

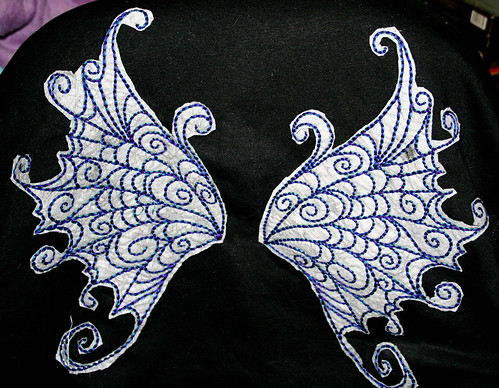
My big project for a while has been an embroidered jacket for our friend's birthday. I got a black hoodie from K-Mart and embroidered wings on the back. I picked this design from Urban Threads as my friend loves butterflies. I love the design, it's really pretty.
This was my first time embroidering on clothing and on fabric that was stretchy. I bought some dissolveable stabiliser. It was a fairly open design without any large areas of solid stitching and as I was hand stitching it rather than machine stitching (one day I may own an embroidery machine but it will have to be when we've moved somewhere bigger, there's not even enough room for a printer here) I figured that dissolveable stabiliser would be enough.
The jacket was black so it was much easier to draw the design on to the stabiliser so I attached the stabiliser on to the outside of the jacket rather than the inside. The dissolveable stabiliser doesn't fuse on with heat so I pined it down and then tacked it on with thread. Getting the stabiliser to stay in the right place and getting the design centred was probably the hardest part of the project.
Once I had the stabiliser in place I used baking paper to trace the pattern off my netbook. It wouldn't all fit on the screen at the size I wanted it so I drew the part that was on the screen, moved the paper up and traced the rest of it. If you turn the brightness up as far as it will go and press really lightly with a soft pencil this is a great way to transfer designs.
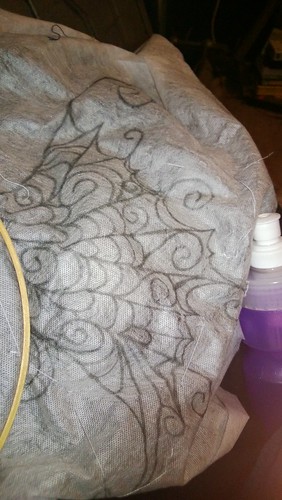
With the design drawn on paper I slipped the paper underneath the stabiliser and got Ruth to put the jacket on so I could make sure I got the wings in the right place. Once I did, I just traced the design on to the stabiliser. Then it was just a matter of choosing my colours, hooping it up and stitching it.
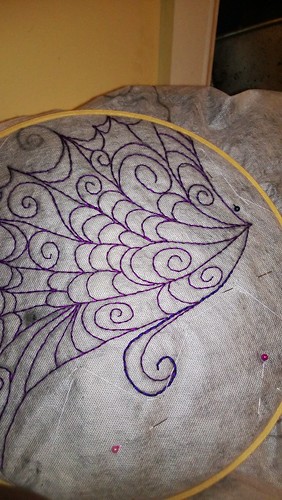
I didn't have a sharp needle that would fit all 6 strands of thread through the eye so I stitched 3 strands in a purple. This didn't show up as much as I'd have liked it to against the black so I added a darker blue and an aqua. I wanted a really bright teal but couldn't find one.
Here is the design mostly stitched in one colour. It showed up great against the white of the stabiliser but not so great against the black of the jacket.
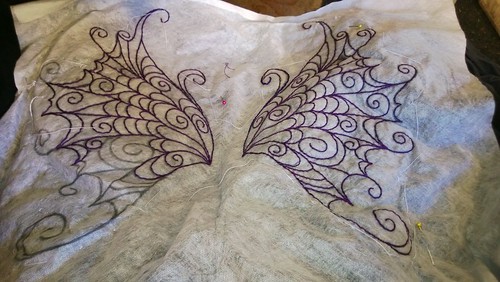
I tried adding a metallic silver thread but it was really difficult to work with and didn't look as good as I wanted it to.
Here you can see the silver down the bottom left corner of the design. I wasn't happy with the way it looked as a highlight colour and I didn't have anywhere near enough to stitch the whole design with it.
If I did this again I'd probably find a colour that stood out well against the black on it's own. I love the look of the three different colours but it took so long. I had to stitch the whole design three times.

Purple, Royal Blue and an Aqua DMC Cotton against the stabiliser.
Once I had finished stitching the design I cut away all the excess stabiliser as my test piece had shown that although the stabiliser dissolves completely it leaves the fabric stiff like starch. I wanted to cut out the bits between the lines of stitching too but with the scissors I had it would have been too easy to cut the fabric so it just wasn't worth it.
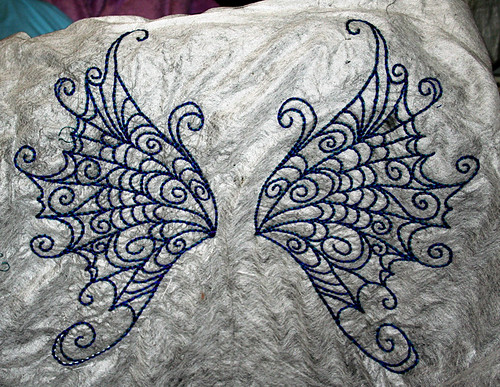
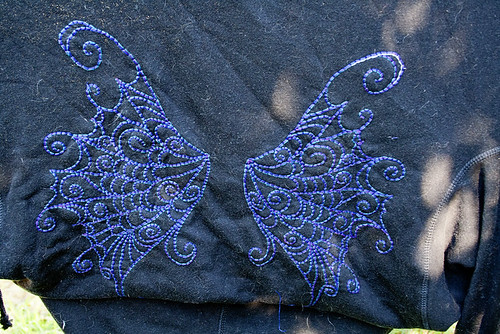
Here's the jacket with the excess stabiliser cut away.
Next I just chucked the jacket in the washing machine on delicate with some towels. There were some glue like marks left on the jacket after the first wash. I don't know if washing it on a normal cycle would get rid of more on the first go, if I should have used washing detergent rather than just soap nuts or if it just needs two washes.
I didn't have time to wash it a second time before posting it but I gave instructions to my friend that the marks should come off after another wash. The stitching held up fine in the washing machine so I was happy about that.
Here's the jacket hanging upside down on the line to dry. I'd lost my card reader for the camera so these are mainly phone photos. The jacket is actually black, not grey and it dried without all those wrinkles.
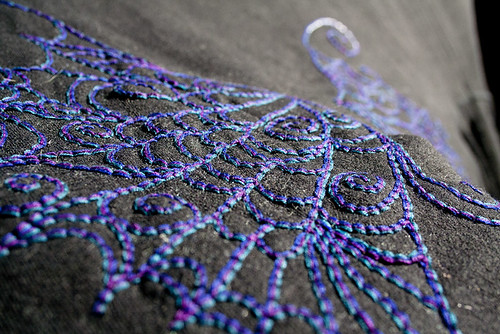
Close up of the stitches
Next month I'll be visiting my friend and I will get some finished photos of someone wearing the jacket in decent light with my proper camera. I just ran out of time.
I ended up using 3 skeins of each colour cotton DMC thread, half a metre of stabiliser and it took just over a week of stitching each evening to finish it.
Given that this was my first on clothing and my first time working from someone else's design I'm very happy with it. There are so many Urban Threads designs I'd love to do. I have a dark blue jacket that is going to get a TARDIS design on it and another black one that I want to stitch the firebird design on and a grey one that I want a tree on the back, maybe this one. I'd also love to do some Streampunk jackets and sew up and embroider a whole bunch of re-usable shopping bags.
Coming Soon: In a couple of days I'll have a post up about the knitted hoodie commission we finished and one about the hats and gloves we've been busy knitting. As soon as my recipient receives the embroidery I posted I will also have a post about the Blinded by Science Phat Quarter Needlework Swap and the absolutely amazing embroidery I received.
I also have a couple of posts about amazing local food and buying direct from the farmers and some recipes we've been making with that awesome local food.
What have you been up to lately craft wise?
Oh wow! I hadn't realized all the detail with what you did with the three colors until I saw that close up pic. I was already impressed, but now I'm blown away. Great work!
ReplyDeleteHi .... thanks for visiting and commenting. Your blog is just great ! .... tried to leave a comment on the retro fairy doll, but my computer couldn't do it .....You've made her into a much loved fairy now :-)
ReplyDelete