Sunday, November 18, 2012

Pottering around the village

We had a few things to do outside so I decided to take my camera with me. It was another glorious day for it. Not so great for me because bright sun just equals migraines. At least it wasn't too hot. There was a lovely breeze.

Visitor's Centre
First up was a trip to the Visitor's Centre to pay the rent.

At the Visitor's Centre you can pick up maps and souvenirs and they have a museum and a tiny art gallery. The village was a massive gold town in the 1870's (The Holtermann Nugget was found here) and there were pictures taken by Beaufoy Merlin during the gold rush. Signs around the village show the photos in the spots they were taken.

The visitor's centre really isn't terribly accessible if you have mobility issues. There is a sign on the front door telling you that there are ramps available inside and to ask at the front desk. To get to the front desk you would have to go down an uneven, rather steep path with a precarious couple of stairs in the middle and then another step up in the doorway. It's not like you can ring ahead either because most people's mobile phones wont work out here. Sometimes I think places only put up the signs for legal reasons.

I walk with a cane at times because of balance and pain issues and I need help getting safely down the stairs in the middle of the path.  

Next up is the Tip. We don't have garbage pick up here so we have to take our bins to the village tip. It's not far though the road is dirt and a bit dicey in the wet.
bush
the edge of the cleared area for the tip

Magpie
The Australian Magpies are a precocious bunch.

pipes

At the tip
I wasn't sure if I liked this one better in colour

At the tip
Or black and white. What do you think?

Then to finish up today we went around to Hosie's B&B. The owners are away on Honeymoon and while other friends are running the bed and breakfast part we are feeding all the birds and watering the garden. I'll post some photos of Hosie's soon.   

Monday, November 12, 2012

New in my shop

sheep earrings front
Just a short note today to mention the newest addition to our Etsy shop.
https://www.etsy.com/listing/114663529/cute-felted-teeny-sheep-earrings
Sheep earrings for Christchurch
sheep earrings back

These cute needle felted earrings are one of a kind creations. Each Teeny sheep is slightly different.
You can choose a white body, a grey body or a dark grey/brown body. All with black heads. If you want something slightly different please don't hesitate to send me a message.
Cute and wooly these are great accessories for your favourite knitter or just someone who loves sheep and animals.
If you have problems with metal allergies I can upgrade the earwires to a specific metal or anodized or stainless steel. Message me and I'll let you know what price I can get.

I've been making these earrings for a while now but I've finally managed to get them listed on Etsy. The first few pairs I made were sold off for charity. The money went to the NZ Earthquake appeal when Christchurch wouldn't stop shaking.

Teeny flock

I've seen lots of lovely needle felted sheep around but still none quite like the Teeny Sheep.
I love their chubby little bodies. I have some I've made up as stitch markers. It's so cute to see the teeny sheep getting all cuddly with the wool as I knit.


PICT3674small

I also have teeny sheep in a terrarium and some teeny sheep that hang out on my monitor (I have a bog old CRT). Well they start off on the monitor but as it's one of the cat's favourite places to sprawl they often end up on the desk. I even found one in the washing machine the other week. I must have had it in my pocket. Thankfully no damage done as they're already felted tight.

PICT3676small

Sometimes they hang out with the Owl Randolph or the Teeny Cow

Owl and teeny sheep

PICT9437

Monday, November 5, 2012

Knitting Alan Dart's Nativity Collection Part 1

 IMG_4706small

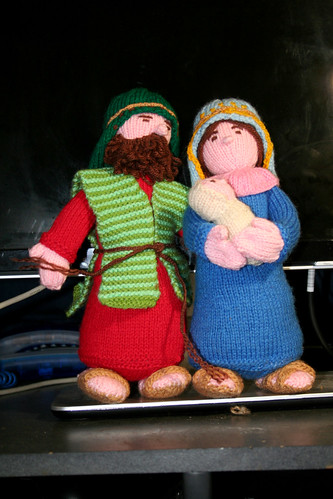
This is going to be knit as an ongoing Christmas present for Nephew (soon to be Nephews). We plan on doing 3 figures a year. First year was a bit of a cheat because one of the figures was Jesus.

Sorry for the lack of decent pictures. It was finished, I took the photos at night and wrapped them up to be posted to Sydney the day before Christmas Eve. Was so pleased they got there in time.

Nativities are not our thing but it seems to go down pretty well with family and means we don't have to struggle to find a present each year.


The pattern is the 
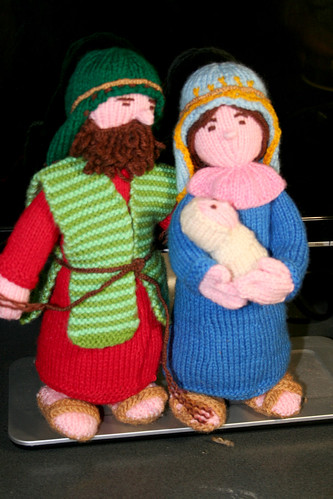
Alan Dart Nativity Collection published in Sirdar 285. Alan Dart has three Nativity patterns. Nativity Set, Christmas Wishes Nativity and the Nativity Collection. We chose the Nativity Collection because it is bigger and much more detailed.
Here is our Project page on Ravelry http://ravel.me/dindalay/tnc2
 
These are all being knit in acrylic and we are avoiding the cardboard because Nephew was 18 months when the first figures arrived and new nephew will be born by the second Christmas so we wanted figures you could chuck in the washing machine if you needed too and ones that didn't have anything sharp in them.

Ruth has knitted all the pieces and I've been sewing them up. As is usual for Alan Dart stuff they look great but the making up instructions are useless and I basically have to make it up myself from looking at the picture.


IMG_4705small

Ruth thought about knitting it all in the round to stop so many of the pieces but I decided it was better to do it in pieces so I have more control over how it is stuffed and can make the changes I need to to make it work.

2011 -
We decided to knit just Mary, Joseph and baby Jesus this year as we started really late but we also liked the idea of the nativity growing each year. When we've finished we may even start on the Noah's Ark. If we're crazy enough by then.

The pattern knits up okay. It's a bit fiddly and there are lots of pieces but it's not massively difficult. It's once you try and follow the making up instructions that I had trouble.

It wasn't quite as hard to follow as the Thomas The Tank Engine making up instructions but when I followed the instructions my figures didn't look anything like the ones in the pictures. The heads sagged, their faces were covered by the headscarves, they wouldn't stand and they just looked really sad.

There is no way a thin strip of knitting was going to hold up the head.
And even if you did put the cardboard in the bottom of the gown, once you add feet to the front of that how does the figure stand?

I took all the pieces apart again and just made up my own way of putting them together. Unfortunately I'm writing this a year later so I'm not sure I can remember everything but I've just put together one of the Shepherds and it's mostly the same technique.

First up I stuffed the gown. I felted some of the polyfill stuffing together into a disk shape for the bottom edge as I didn't want to use cardboard. It made it a bit more stable. I just rubbed it together in my hands. Using the felting needle was just too time consuming for this but you could get a much firmer felt with it. I was just on a time limit.

Then I tacked the arms on with spare yarn so I could make sure they were in the right place. So many times I've sewn limbs on and then found they are in the wrong place. I wanted to make sure that the seam of the gown was at the back. This wouldn't be an issue if you knit the gown in the round.

I put the head on after the arms as it's easier to get it to line up. To get the neck to stay upright I had to change the way I sewed it on. I didn't want to use a toothpick or pipe cleaner as I wanted to make these safe for babies.

IMG_0705edit
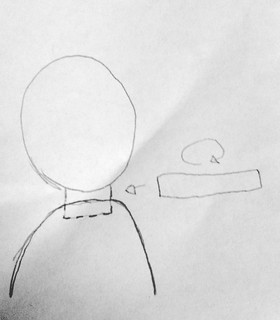
(Excuse the dodgy drawings. I'll update these once I'm well enough to sit at the computer)

I sewed the neck piece to the head and then sat that almost totally inside the neck hole of the gown.
I threaded a piece of yarn the same colour as the gown around the neck hole in the gown and pulled it tight around the neck piece. I then used yarn the same colour as the skin to make sure the neck was sewn to the gown well and threaded it up to the had and back down all the way around the neck. This makes it thicker and stronger. You could also use thicker yarn for the neck


IMG_0707edit

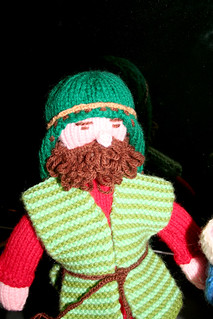
I think all the figures have beard/headscarf/tabard thing to cover the neck except Mary and she has that collar thing too so you don't really see it.

Make sure with Mary you put the collar thing on before sewing the neck into the body piece though.

 I had to add way more hair for it to show up under Mary's headscarf and I decided it looked better down in a ponytail at the back rather than tied in a bun where you couldn't see it and it just made the headscarf bump out oddly.

IMG_4707small

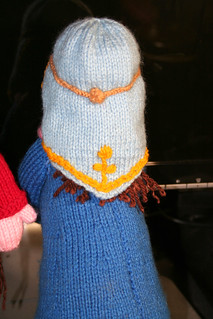
As a lot of people have said, the headscarves are usually too big. I ended up tacking them on in places to make them sit right. I also threaded more yarn of the same colour around the bottom edges of the headscarves to try and get them to stay flatter.
I think in the end just tacking it to the body at the bottom and around the shoulder area on both sides was more successful.

I didn't embroider the eyes until I had the headscarf stitched in place and the nose sewn on. I then just did them where they looked good rather than counting the stitches because the headscarf took up much more space that it should.

Ruth used the same normal yarn for the beards as we didn't haven anything fuzzy. They came out pretty massive and I had to thread more yarn through the edges and pull it tight to get a better size to fit on the faces.

IMG_4715small

After about three goes at Mary's eyebrows making her look odd or like a man I ended up doing three small stitches in a curved arc rather than the straight stitch. Women have more curved eyebrows. It really made the difference. I also gave up on trying to give her a mouth. She looked better on mine without one.

IMG_4710small

The feet I also stuffed with semi felted stuffing. I still had to sew them on many times before I could get the figures to even stand up some of the time.
I can see why people added something at the back to make these stand up right. Once you sew the feet on to the front they rock back and tend to fall over.
I sewed them as far apart as I could and with very little sticking out the front of the figures. They stood up okay.

(This year when making the next figures I used some foamboard to cut out the circle at the bottom and the feet pieces in the pattern. This has made them a little more stable but they still aren't as upright as I'd like. If you weren't making them to be put through a washing machine then beans or rice would help a lot to stand them up. I think you could also easily leave the feet off.)

Once I'd finished putting Mary and Joseph together I
decided that they were too plain. I know that Mary and Joseph were meant to be poor but if you make your own clothes you can embroider them cheaply to make them look better.

I chain stitched in yellow around the edge of Mary's headscarf with some straight stitch details on the front and and a flower in straight stitch on the back.
I just did running stitch around the edge of Joseph's headscarf.

IMG_4705small

IMG_4709small

I couldn't do the twisted cord for the belts and around the headscarves so I used what I've always known as fingerknitting. It's basically like chain stitching in crochet but you pull it tight after each stitch and I do it with my fingers. I'm sure it has a proper name somewhere.

I then unspun the ends of the cords once knotted on Joseph and as I wanted it a bit neater on Mary I knotted it up and I think I used the felting needle to make sure it all tucked in there.

I will write up about the next lot of figures once Christmas is over because family wants them to be a surprise. I'm taking more photos this time. We started much earlier.

IMG_4704small

Saturday, November 3, 2012

Hill End Press: Wedding stationery

Hill End Press have their studio across the road from our cottage. It's run by the wonderful Bill Moseley and Genevieve Carroll.
The shop itself is gorgeous but it's full of their wonderful creations, art and photography. There are so many things to see. I'm always fascinated by the drawers full of letters for the press.

I really have a deep love of creating in ways that haven't changed in hundreds and hundreds of years. It's one of the main reasons I love spinning. Sitting and peddling the wheel and drafting the fibre in the same way it was done when our cottage was built (sometime before the 1870's) is just so satisfying to me.

I'd love one day to watch the press in action. They run workshops as well and I'd love to do one but for now we just don't have the money for any kind of workshop.

They recently posted a glimpse of our their letterpress wedding stationery range. I'm in love.

You can find them at their blog and their website http://hillendpress.com.au/ or at the shop on the corner of Tambaroora and Short Streets in Hill End, NSW

Friday, November 2, 2012

Brain Fog and knitting

One of the worst symptoms of my collection of health problems, other than pain, is the brain fog.
It often makes it hard to carry on a conversation, I have massive gaps in my memory of times when I was in a flare, I get lost in my 4 room house (can't remember which door takes me where) and things like that. It's incredibly frustrating and sometimes a little frightening.

Yesterday we had appointments at the doctor's and a bunch of other things to do. I had a big day. There's the three hours driving and I did some walking around shops and had to try on some clothes. We ended up having to go and sit in McDonald's for a while while I took pain killers, ate some food and drink and rested. I was to exhausted and in pain to even attempt the drive home. It's not an easy road. I haven't been that bad in a long time.

Anyway I recovered enough to drive home and, after shutting off for a while and watching QI, I downloaded the first installment of Woollywormhead's Mystery Hat Knit-A-Long. I read the instructions, found the needles, Ruth showed me how to do a provisional cast on and off I went with knitting.
It wasn't until this evening, after knitting a few inches, that I checked the Ravelry board for it and realised that I'd been knitting it flat when it had said to knit it in the round. I had been slightly confused by some of the later instructions but I'd just decided to look at that further when I'd got up to it.

Thankfully I had only done a few inches rather than the whole 21. It's one of the more harmless confusions so it doesn't bother me too much and I guess it's something that's easy to do even if you're not ill. Wish I'd checked it this morning before carrying on with the knitting though.

I've now started again and hopefully things will go smoother from this point. I will be double and triple checking instructions anyway. Maybe I should get Ruth to check them for me too.

The pattern calls for 5ply, which I didn't have and 3.5mm needles, which I also didn't have as Ruth was using them but I knitted a swatch and found that my 4ply yarn (Bendigo Woolen Mill's 4ply Luxury 100% wool in the Brick colourway) and 3.25 needles were getting me gauge so I shall see how I go. Wish me luck.

Here are some general knitting photos. None of the actual project as it's a mystery.
Chemical Love in progress

Paw Tracks sock in Jitterbug

Cotton bear

Thursday, November 1, 2012

A closer look at my Tiny House series

Tiny HouseIMG_6878
Tiny House

I have three houses in the series completed so far. They are all  for sale in our Etsy shop. Click on the houses to go to their listing.

Part of the reason I'm interested in tiny houses in craft is their cuteness and part of is the fact that I live in one. Actually our tiny house is smaller than the first two of these. Two years ago we ended up moving to a four room house in the middle of nowhere.

Trying to go from a two bedroom, reasonably small house with a garage to four tiny rooms was not easy. We still have boxes up against the walls because there is just nowhere to unpack to.

PICT9011done

The bedroom and lounge room in the cottage are much older than the other two rooms. They date back to before the 1870s gold rush. In 1872 - 1874 it was used as the first police station in the village and at some point in 1874 to the mid 1880's it was a telegraph office.

IMG_6828

In the 1930's it was bought, along with Hosie's Store (now Hosie's B&B) by Ruth's Great Grandfather and  they built a kitchen on. In the 1970's the house was taken by National Parks and Wildlife and they added an indoor bathroom/laundry.

We're on tank water rather than town but at some point we'll have to get reconnected to town water again because the tanks just aren't big enough for people living here full time. We don't have a phone line and we had to get satellite internet installed when we moved in.
We don't have a postal delivery, we walk to the Post Office to pick it up and we have to take our own rubbish to the tip. The nearest shopping, doctors, hospital, chemist etc are an hour and a half drive away.

IMG_4268small

It's something we've managed to get used to but coming from Newcastle where everything was less than 20mins drive away it was a bit of a lifestyle change.

There are some fantastic benefits to living out here. The main one for us is the fact that it's cooler here than on the coast. We are over 800m above sea level and we are often 10c less than where we used to live.
Neither Ruth or I do well in the heat at all so it's lovely to not get above 30c often in summer and most nights have it actually cool down to about 12c.
We do get much colder winters but we have an open fire place, a small lounge room that we can shut off, walls that are about a foot thick in the front two rooms and an electric blanket so we keep pretty toasty.
Not to mention the fact that we both knit and have a lovely collection of wool hats, gloves, jumpers and socks to keep us warm.
So far though we've only seen it snow one day each year and not for very long. As much as I love the look of snow and it's a real novelty here in our part of Australia I really don't want to be driving on it.

snow in Hill End

snow in Hill End
(used one of the Pioneer Woman Actions on this)

Another benefit to living here is the amount of fruit trees in the village. Because the village used to be so much larger and it was at a time when people had to be as self sufficient as possible because the journey to Bathurst was incredibly slow and dangerous there are fruit trees all over the place.

IMG_4566small

IMG_4570small

PICT3017small

We also have lots of Kangaroos that hang around the village

PICT3352small 
 
PICT3366small

There's also silence. I've never lived somewhere so quiet most of the time and the stars are amazing  but I don't have photos of those.

Tiny House
I think this one is my favourite. It is partly based on a Hobbit hole but also partly on the Nissan Hut we used to live in. 

Tiny House
Tiny House
These two are based more on traditional simple drawings of houses.

Coming soon will be some more traditional cottage shapes along with some mushroom and toadstool houses and some more fairy tale based ones, even some tiny castles. I have some sketches for now. Just need to sit down and stitch some more and then wait until I can afford more hoops.