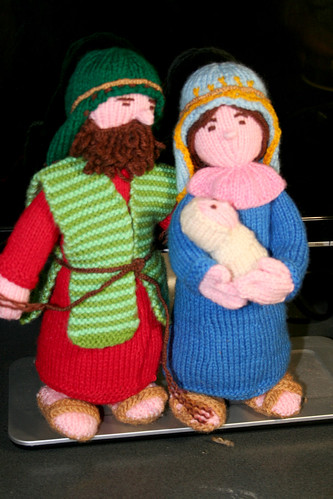
This is going to be knit as an ongoing Christmas present for Nephew (soon to be Nephews). We plan on doing 3 figures a year. First year was a bit of a cheat because one of the figures was Jesus.
Sorry for the lack of decent pictures. It was finished, I took the photos at night and wrapped them up to be posted to Sydney the day before Christmas Eve. Was so pleased they got there in time.
Nativities are not our thing but it seems to go down pretty well with family and means we don't have to struggle to find a present each year.
The pattern is the Alan Dart Nativity Collection published in Sirdar 285. Alan Dart has three Nativity patterns. Nativity Set, Christmas Wishes Nativity and the Nativity Collection. We chose the Nativity Collection because it is bigger and much more detailed.
Here is our Project page on Ravelry http://ravel.me/dindalay/tnc2
These are all being knit in acrylic and we are avoiding the cardboard because Nephew was 18 months when the first figures arrived and new nephew will be born by the second Christmas so we wanted figures you could chuck in the washing machine if you needed too and ones that didn't have anything sharp in them.
Ruth has knitted all the pieces and I've been sewing them up. As is usual for Alan Dart stuff they look great but the making up instructions are useless and I basically have to make it up myself from looking at the picture.
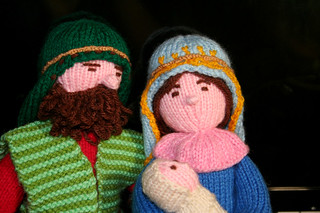
Ruth thought about knitting it all in the round to stop so many of the pieces but I decided it was better to do it in pieces so I have more control over how it is stuffed and can make the changes I need to to make it work.
2011 -
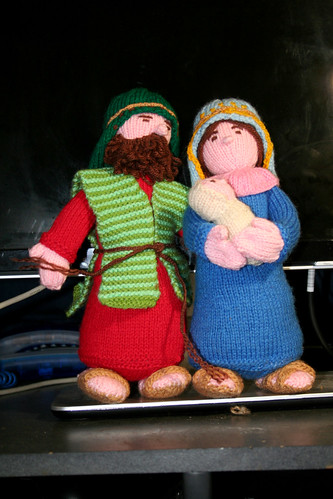
We decided to knit just Mary, Joseph and baby Jesus this year as we started really late but we also liked the idea of the nativity growing each year. When we've finished we may even start on the Noah's Ark. If we're crazy enough by then.
The pattern knits up okay. It's a bit fiddly and there are lots of pieces but it's not massively difficult. It's once you try and follow the making up instructions that I had trouble.
It wasn't quite as hard to follow as the Thomas The Tank Engine making up instructions but when I followed the instructions my figures didn't look anything like the ones in the pictures. The heads sagged, their faces were covered by the headscarves, they wouldn't stand and they just looked really sad.
There is no way a thin strip of knitting was going to hold up the head.
And even if you did put the cardboard in the bottom of the gown, once you add feet to the front of that how does the figure stand?
I took all the pieces apart again and just made up my own way of putting them together. Unfortunately I'm writing this a year later so I'm not sure I can remember everything but I've just put together one of the Shepherds and it's mostly the same technique.
First up I stuffed the gown. I felted some of the polyfill stuffing together into a disk shape for the bottom edge as I didn't want to use cardboard. It made it a bit more stable. I just rubbed it together in my hands. Using the felting needle was just too time consuming for this but you could get a much firmer felt with it. I was just on a time limit.
Then I tacked the arms on with spare yarn so I could make sure they were in the right place. So many times I've sewn limbs on and then found they are in the wrong place. I wanted to make sure that the seam of the gown was at the back. This wouldn't be an issue if you knit the gown in the round.
I put the head on after the arms as it's easier to get it to line up. To get the neck to stay upright I had to change the way I sewed it on. I didn't want to use a toothpick or pipe cleaner as I wanted to make these safe for babies.
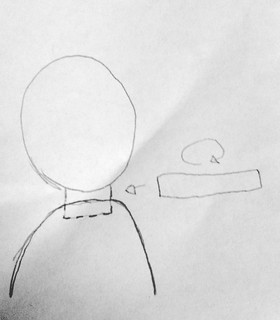
(Excuse the dodgy drawings. I'll update these once I'm well enough to sit at the computer)
I sewed the neck piece to the head and then sat that almost totally inside the neck hole of the gown.
I threaded a piece of yarn the same colour as the gown around the neck hole in the gown and pulled it tight around the neck piece. I then used yarn the same colour as the skin to make sure the neck was sewn to the gown well and threaded it up to the had and back down all the way around the neck. This makes it thicker and stronger. You could also use thicker yarn for the neck
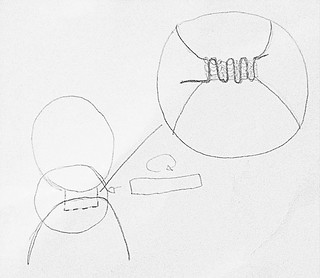
I think all the figures have beard/headscarf/tabard thing to cover the neck except Mary and she has that collar thing too so you don't really see it.
Make sure with Mary you put the collar thing on before sewing the neck into the body piece though.
I had to add way more hair for it to show up under Mary's headscarf and I decided it looked better down in a ponytail at the back rather than tied in a bun where you couldn't see it and it just made the headscarf bump out oddly.
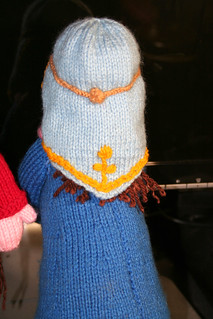
As a lot of people have said, the headscarves are usually too big. I ended up tacking them on in places to make them sit right. I also threaded more yarn of the same colour around the bottom edges of the headscarves to try and get them to stay flatter.
I think in the end just tacking it to the body at the bottom and around the shoulder area on both sides was more successful.
I didn't embroider the eyes until I had the headscarf stitched in place and the nose sewn on. I then just did them where they looked good rather than counting the stitches because the headscarf took up much more space that it should.
Ruth used the same normal yarn for the beards as we didn't haven anything fuzzy. They came out pretty massive and I had to thread more yarn through the edges and pull it tight to get a better size to fit on the faces.
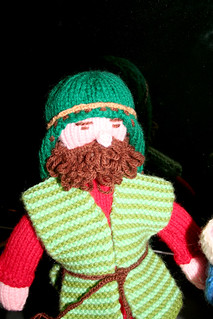
After about three goes at Mary's eyebrows making her look odd or like a man I ended up doing three small stitches in a curved arc rather than the straight stitch. Women have more curved eyebrows. It really made the difference. I also gave up on trying to give her a mouth. She looked better on mine without one.

The feet I also stuffed with semi felted stuffing. I still had to sew them on many times before I could get the figures to even stand up some of the time.
I can see why people added something at the back to make these stand up right. Once you sew the feet on to the front they rock back and tend to fall over.
I sewed them as far apart as I could and with very little sticking out the front of the figures. They stood up okay.
(This year when making the next figures I used some foamboard to cut out the circle at the bottom and the feet pieces in the pattern. This has made them a little more stable but they still aren't as upright as I'd like. If you weren't making them to be put through a washing machine then beans or rice would help a lot to stand them up. I think you could also easily leave the feet off.)
Once I'd finished putting Mary and Joseph together I
decided that they were too plain. I know that Mary and Joseph were meant to be poor but if you make your own clothes you can embroider them cheaply to make them look better.
I chain stitched in yellow around the edge of Mary's headscarf with some straight stitch details on the front and and a flower in straight stitch on the back.
I just did running stitch around the edge of Joseph's headscarf.


I couldn't do the twisted cord for the belts and around the headscarves so I used what I've always known as fingerknitting. It's basically like chain stitching in crochet but you pull it tight after each stitch and I do it with my fingers. I'm sure it has a proper name somewhere.
I then unspun the ends of the cords once knotted on Joseph and as I wanted it a bit neater on Mary I knotted it up and I think I used the felting needle to make sure it all tucked in there.
I will write up about the next lot of figures once Christmas is over because family wants them to be a surprise. I'm taking more photos this time. We started much earlier.

A lot of the Knit a Fantasy Story pieces said to use cardboard inside for stability too. I've been using plastic canvas with bit of scrap yarn wound around the edges to keep them from poking through. Not sure if it would help for your people, but thought I'd pass it along just in case :)
ReplyDeleteThanks Patti.
DeleteThe foam works quite well at the moment as it's soft and will bounce back into shape.
If I get stuck I'll give it a go. Though I'm not sure where I'll find it.
Will the foamboard allow the figures to be washed or handwashed?
ReplyDelete